How to combine tools at the Linux command line to unleash its power

The massive power of the Linux command line comes from mainly two things:
First: The powerful command line tools available
There are a ton of command line tools you can find on any Linux system. Tools for every aspect of controlling the Linux system itself as well as tools for managing and processing your data and files in every single way you can think of.
And most of these tools follow a concept called DOTADIW:
DOTADIW: Do one thing and do it well.
So as a simple example, you have for instance the tool "w" for counting something. Or take the tool "sort" that is only used for different ways of sorting data.
But our real-world problems are typically a bit more complex than just counting or sorting something. This leads us to the second reason that makes the Linux command line so powerful …
Second: Flexible ways to combine multiple tools
The Linux command line gives you different ways to connect multiple tools with each other to solve a “bigger” problem. And this is what this article is all about - combining multiple tools.
The two reasons for combining tools at the Linux command line
There are typically two reasons why you need to combine tools at the Linux command line.
The first one is to do some sort of data processing …
such as for instance
- you get some data from a file
- you extract only the data that is useful for you
- you sort the data according to your needs
- then you reformat the data
- …
I think you’ve got the point: You have a command line that gives you some data, and then you wanna give this data to the next command to process it further:

The second reason for combining tools is to implement some logic …
as for instance to …
- restart a process if it isn’t running anymore
- send an email if a disk is full
- generate a warning if a system isn’t “pingable” anymore
- highlight data if it matches a pattern
- …

Let’s start our journey with the first reason mentioned. Let’s start with combining Linux command line tools for processing data …
Combine tools for processing data
If you have two commands “cmd1” and “cmd2”. And you wanna have cmd2 to process the data cmd1 gives you, you simply combine these two commands at the command line with a vertical bar.
I bet you have seen - and perhaps even used - this before:

The vertical bar is often called a “pipe” and it feeds the output of cmd1 to the input of the cmd2 command.
And the data “cmd2” gives you as a result, can then be further processed by a third command “cmd3”.
And the output this command gives you can then be fed straight into “cmd4” and so on …

Although I’ve abbreviated the command lines here just with cmd1, cmd2 and so on, these command lines cannot only be single commands. They can be full blown command lines - as complex as you need them.
The pipe sign (“|”) is - for the Linux shell - a “command separator”. That means, that the parts before and after each pipe sign are interpreted completely independently from each other.
These two parts are only connected by the stream of data (aka the “data stream”) that flows from the left part to the right one.
A first simple example data stream
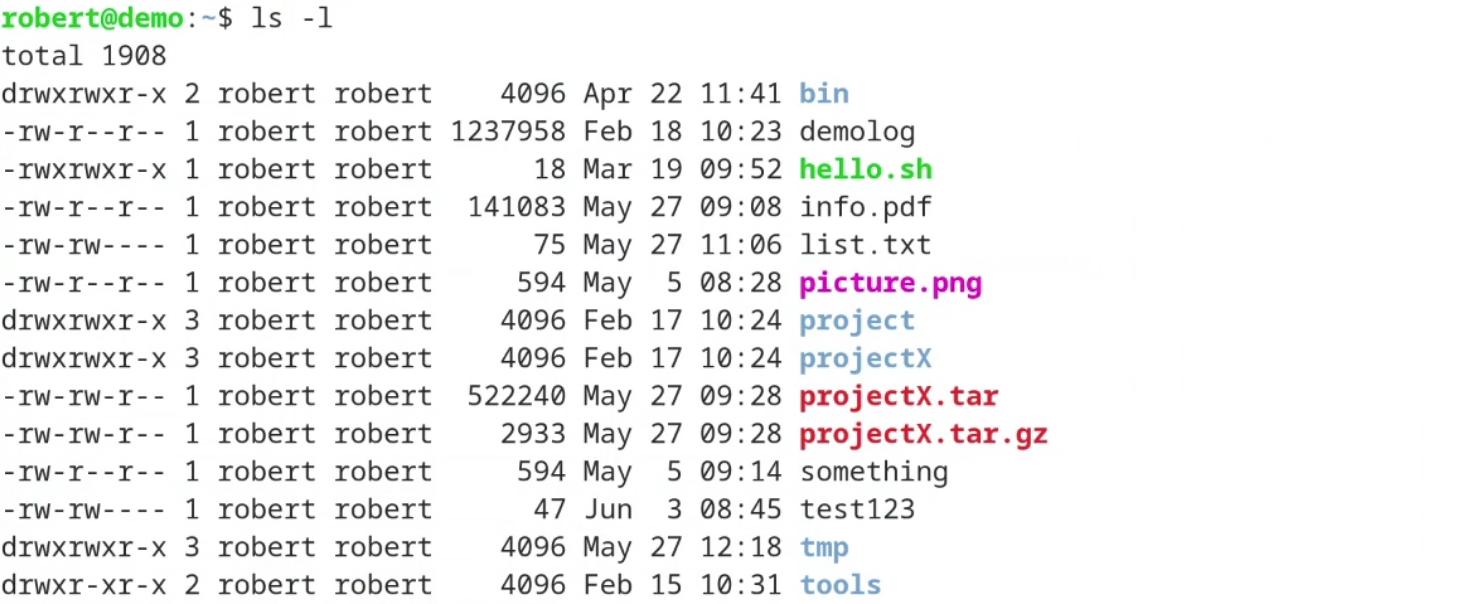
Let’s have a look at a really simple example here. Let’s take the command “ls -l” that gives me on my demo system the following output:
Now let’s assume that I wanna filter this output.
Let’s assume I am only interested in lines containing the string “.pdf”.
The tool for doing such a “filtering” of data at the Linux command line is the tool "grep".
Filter the data stream with “grep”
If you want to search for something in a data stream, then - in the most simple use case - you just have to give a single string as the search pattern to the “grep” command:
... grep <pattern> ...
“grep” then works line wise:
It always reads in all the lines it can get but it prints out only those lines matching the specified pattern.
To see only the lines I’m interested in for this example, I simply pipe the data "ls -l" gives me to "grep '.pdf'":

And as you can see, the two combined commands show us only one single line. The line containing the file “info.pdf”.
We have filtered the output of “ls” by using “grep”.
Sure - the same result could have been seen with "ls -l *.pdf". But I wanted to show you here how you can use “grep” at the command line to easily filter an output you get for only the lines you are interested in.
side-note: As you see in the screenshot above, “grep” typically colors the output in a way that you can recognize the matching part of every line at a glance. If your grep is configured by default in a different way, then just add the command line option "--color" to grep to see the same behavior.
Let’s take a different and little more extensive example …
A second example combining more than just two tools
Let’s assume that we want to search for important running processes. We want to make sure that some important processes are running and we want to know their number.
And at the end, we want to email this number as a kind of report.
At first - we need a list of all currently running processes.
How to get the list of all running processes on a system?
Really simple: Just by running "ps ax".
This gives you a list of every single process currently running.
If you are not familiar with this command - here is a screenshot of a few lines of the output this command gives me on my demo system:

I have marked two important pieces of information here:
First, the process-id (PID). This number is the only real handle you have to control a single process. For instance, if you want to terminate or stop a process later on.
But for this example here, we are only interested in the “command line”. This is - to put it simply - the command line that was used to start the running process.
Now let’s assume that the “important processes” we are interested in have the pattern “squid” in their command line. (squid is an often used http/https proxy server)
Filter the output of “ps ax” to see only the important processes
To get only the running squid processes, we again use the “grep” command here to filter the output of “ps ax”:

Again: We feed the output the “ps” command gives us to the input of the command “grep”.
What you see is that there are four lines in the output of “ps ax” containing the pattern squid.
But don’t get fooled by “grep”
If you take this approach in a real-world scenario, please don’t get fooled by grep:
Have you recognized in the screenshot above, that one of the listed processes was a “grep” process searching for squid?
“grep” found itself in the list of running processes:

No matter what nonsense you are searching for in the list of running processes - grep will always find at least one process running: itself

To avoid this in a real world scenario, you need to filter out the lines containing the grep command itself.
You can do this for instance by adding a second “grep” command after the first one, that only shows the lines not containing the phrase “grep”.
This can be done with the “-v” command line switch followed by “grep” - the pattern for lines you don’t want to see:

As you can see - the resulting output of the combined command lines in this example is now empty. There is no process named “the-biggest-nonsense” running.
Now let’s count the running important processes with “wc”
Now that we have a list of the important processes running, let’s count them.
The fastest and most simple way to count something at the Linux command line is the command line tool "wc"`, which is an abbreviation of “word count”.
But despite its name - “wc” cannot only be used to count for words. Instead you can count for instance characters and lines too:

If we want to get the number of running processes, we don’t need the characters and words of the output. Instead we are only interested in the number of lines. So we add the tiny “-l” command line switch to “wc”:

This is one tiny thing you should add to your repository of command line tricks you’ll use again and again:
If you want to count the lines of an output, simply add
" | wc -l"at the end.
For this example, let’s go a last step further and let’s email the number we’ve got as a report to the admin.
Let’s email the output to an admin user
Sending emails directly from the Linux command line is as easy as “piping” the data you want to send to the command "mail".
... | mail ...
Sure, some prerequisites must be met in advance:
-
a “mail transfer agent” needs to be installed
The mail transfer agent (MTA) is this piece of software that takes the email you want to send and delivers it to the recipient’s inbox or forwards it to the next MTA on the path to the recipient. Typically used MTAs on Linux are “postfix” or “exim”.
-
the email-routing needs to be configured
The email-routing is a configuration of the MTA that describes how emails can reach their destination - for instance via a smart-host.
-
the command line tool “mail” needs to be available
This command line tool often is installed together with the MTA. If not: Have a look for a software package called “mailutils”.
But if everything is prepared carefully, we can easily forward the number we found via email:

As you can see, the email address we want to send the data to is the last parameter to the mail command.
By adding a "-s" switch you set the email subject to your needs.
Now that we have talked about combining tools for processing data, let’s talk about implementing some sort of logic at the Linux command line …
Combine tools at the Linux command line for implementing logic
Sometimes you do not only want to process data. Sometimes you wanna do some action based on the success or failure of a previously run command line.
And the Linux command line gives you two simple options to implement such a type of logic with the help of otherwise quite conventional command lines.
First, you can run a second command line only in case the first one was run successfully. And second, you can run the second command line only if the first one was executed with failure:

To implement this, we need to introduce two new command line separators: The pair of ampersands ("&&") and the pair of vertical bars ("||").
Run a following command only, if the first one succeeded
With the help of the pair of ampersands, you can implement logic in the following way:

The second command line “cmd2” will only be executed, if the first command line “cmd1” was run successfully.
Although I again called the two command lines “cmd1” and “cmd2”, they can be full blown command lines as complex as you need them.
Let’s revisit the example from above where we were searching for important running processes. We did this by simply filtering the output of “ps ax” to only see the process we are interested in:

Now let’s say we want to implement a simple logic that runs a command only, if some of our important squid processes are running.
The “success” we want to act on here is the success of the “grep” command. If “grep” has found matching lines, then it signals success. Otherwise it will signal failure.
To keep it simple, I just wanna print out a message if “squid” processes were found:

As you can see it in the last line of the output, the second command (echo "squid is running") was executed. And this was just because the command line before the pair of ampersands has signaled success.
Let’s prove this the other way around. Let’s search for a process that definitively isn’t running on the system: The process “squid123”:

We don’t see any lines printed out by grep here, nor do we see any message printed out by the “echo” command.
The command “grep” didn’t find any line here and therefore signaled a failure. And therefore the second command line with the “echo” command wasn’t started anyway.
Let’s try the logic the other way around …
Run a following command only, if the first on failed
While the two ampersands start a second command only in case of success, the pair of vertical bars ("||"`) can be used to start the following command line only, if the previous one has signaled an error.

Let’s re-use our example from above to print out a warning, if an important process is not running:

You can see that the warning (“squid is not running!”) wasn’t printed out. That’s just because the grep command has found a few matching lines and therefore signaled success.
Let’s prove this the other way around with a process that is definitively not running here:

This time, grep couldn’t find any matching line, therefore signaled an error, and therefore our warning message was printed out.
Cool, isn’t it?
And lastly, let’s answer the question you probably have in mind now …
How does the shell recognize failure or success
The answer to this can be very handy for debugging purposes or just for planning your logical paths. And it is really straightforward and simple:
Every command sets a return code at the end of execution.
And with the help of this return code, the shell recognizes failure or success:
- The return code is equal to “0”: the command was executed successfully
- The return code is different from “0”: the command signals an error
Where an error does not necessarily mean that there was a literal error during the execution of the command line. Often it just means something like “I’ve got no data” or “I couldn’t do the action you asked for”.
See the return code in action with the built-in shell-variable “?”
Directly after running a command line, simply execute “echo $?” to see the return code that was set.
Let’s have a look after searching for running processes:

And now, after searching for processes that are not running:

And now? Have fun, but always keep in mind:
with great power comes great responsibility 🙂
Here is what to do next

If you followed me through this article, you certainly have realized that knowing some internals about how things are working at the Linux command line, can save you a lot of time and frustration.
And sometimes it’s just fun to leverage these powerful mechanics.
If you wanna know more about such “internal mechanisms” of the Linux command line - written especially for Linux beginners
have a look at “The Linux Confidence Framework”
In this framework I guide you through 5 simple steps to feel comfortable at the Linux command line.
This framework comes as a free pdf and you can get it here.
Wanna take an unfair advantage?

If it comes to working on the Linux command line - at the end of the day it is always about knowing the right tool for the right task.
And it is about knowing the tools that are most certainly available on the Linux system you are currently on.
To give you all the tools for your day-to-day work at the Linux command line, I have created “The ShellToolbox”.
This book gives you everything
- from the very basic commands, through
- everything you need for working with files and filesystems,
- managing processes,
- managing users and permissions, through
- software management,
- hardware analyses and
- simple shell-scripting to the tools you need for
- doing simple “networking stuff”.
Everything in one single, easy to read book. With explanations and example calls for illustration.
If you are interested, go to shelltoolbox.com and have a look (as long as it is available).